This document will take your through the installations steps to connect the ComQi player to the ELO screen and start the commissioning process to EnGage The pre-install set up of the player and screen within Engage MUST be done to ensure all three components are working and the content is fully up-to-date to avoid issues at site during install.
Prior to this work being completed, EnGage should be set up with each individual site nodes in preparation for equipment to be assigned to the physical site.
Step 1 - Player Connections and MAC address
Step 2 - Screen Connections.
Step 3 - Screen Calibration.
Step 4 - Setting up the screen and recording the serial numbers.
Step 5 - Report the Location, player MAC address and screen serial numbers.
1.) Player Connections and Mac Address
- Connect the data, HDMI to the screen , USB to the screen and power on the player. Once connected, it should look similar to the image below. Note and record the MAC address of the player.

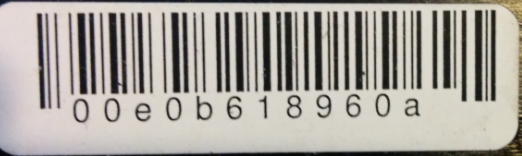 Player Mac Address Example
Step 3.) Screen Calibration Process
- The calibration process needs to be done to match the player with the screen. The calibration settings are stored within the player for that particular screen. When the process is finished, label the player and screen so they can be kept together during shipping.
ComQi Player Touch Calibration Tool zip file. This is available in the EnGage Help Section.
-
Please DO NOT copy the zip file. It has to be extracted to maintain the right file format to work with the ComQi
player. Below is a screen shot of the zip file being extracted to a thumb drive “I”

Getting the Player and Screen Ready and Calibrating the Player and Screen Pairing
-
With the player and screen connected as above, make sure the
screen is powered up and the player powered down.
-
Connect the thumb drive to any USB port on the player.
-
Power up the player.
-
The player will power up and display the ComQi screen, you
should see the USB update and performing update message.
- You should then get the main calibration screen (screen shot below )
- Follow the on screen directions and touch the touch points as they are displayed.
- Once the calibration is complete the player will reboot, remove the thumb drive before the ComQi screen comes back on.
- Label the player and screen as a pair so they can be connected together after shipping
- The calibration process is now complete.

4.) Setting Up the Screen and Recording the Serial Numbers
Turning on RS232
-
Using trhe panel's remote control. Click Menu, then Left and Right arrows and Select key to navigate through
the on screen menu’s to turn on RS232
-
Select "Other Setting"
Select "MDC Protocol"
Select "RS232"
Select "Information"
Select "Monitor Information"
Record both monitor touch screen serial numbers


5.) Report the Location,Player MAC Address, and Screen Serial Numbers
- For the player and screen to be commissioned and made active, they must both be powered on and connected to the internet.
- An e-mail will need to be sent to customersupport@comqi.com. The e-mail subject line must be “CTM ELO Install”
- Within the body of the email, provide the following:
- Name of the facility/location;
- Address of the facility/location
- MAC address of the player (this is a 12 digit number you recorded in step 1.))
- Monitor Serial Number
- Touch Screen Serial Number
- Once this e-mail is sent, ComQi will commission the players. You should expect a 24 hour response time for this work to be completed. It is expected that this work will be done off site prior to install. When the tech arrives on site, he can install equipment and expect the players to automatically commission and connect and be verified by checking Engage. If all is connected and health, green connection and commission lights will display as seen below.
